Customers
Everyone who has booked with you, with their licence check, tier and booking history. This is where you approve licences before pickup, decide who may pay less up front, and handle personal-data requests.
- Where
- Customers → Customers
- Who can use it
- Owners, managers and front desk. Only owners and managers can report to or withdraw from the shared watchlist.
- Plans
- Every plan. Customers are free and don't use staff licences.
- Checked
- Sep 25, 2026
What you can do
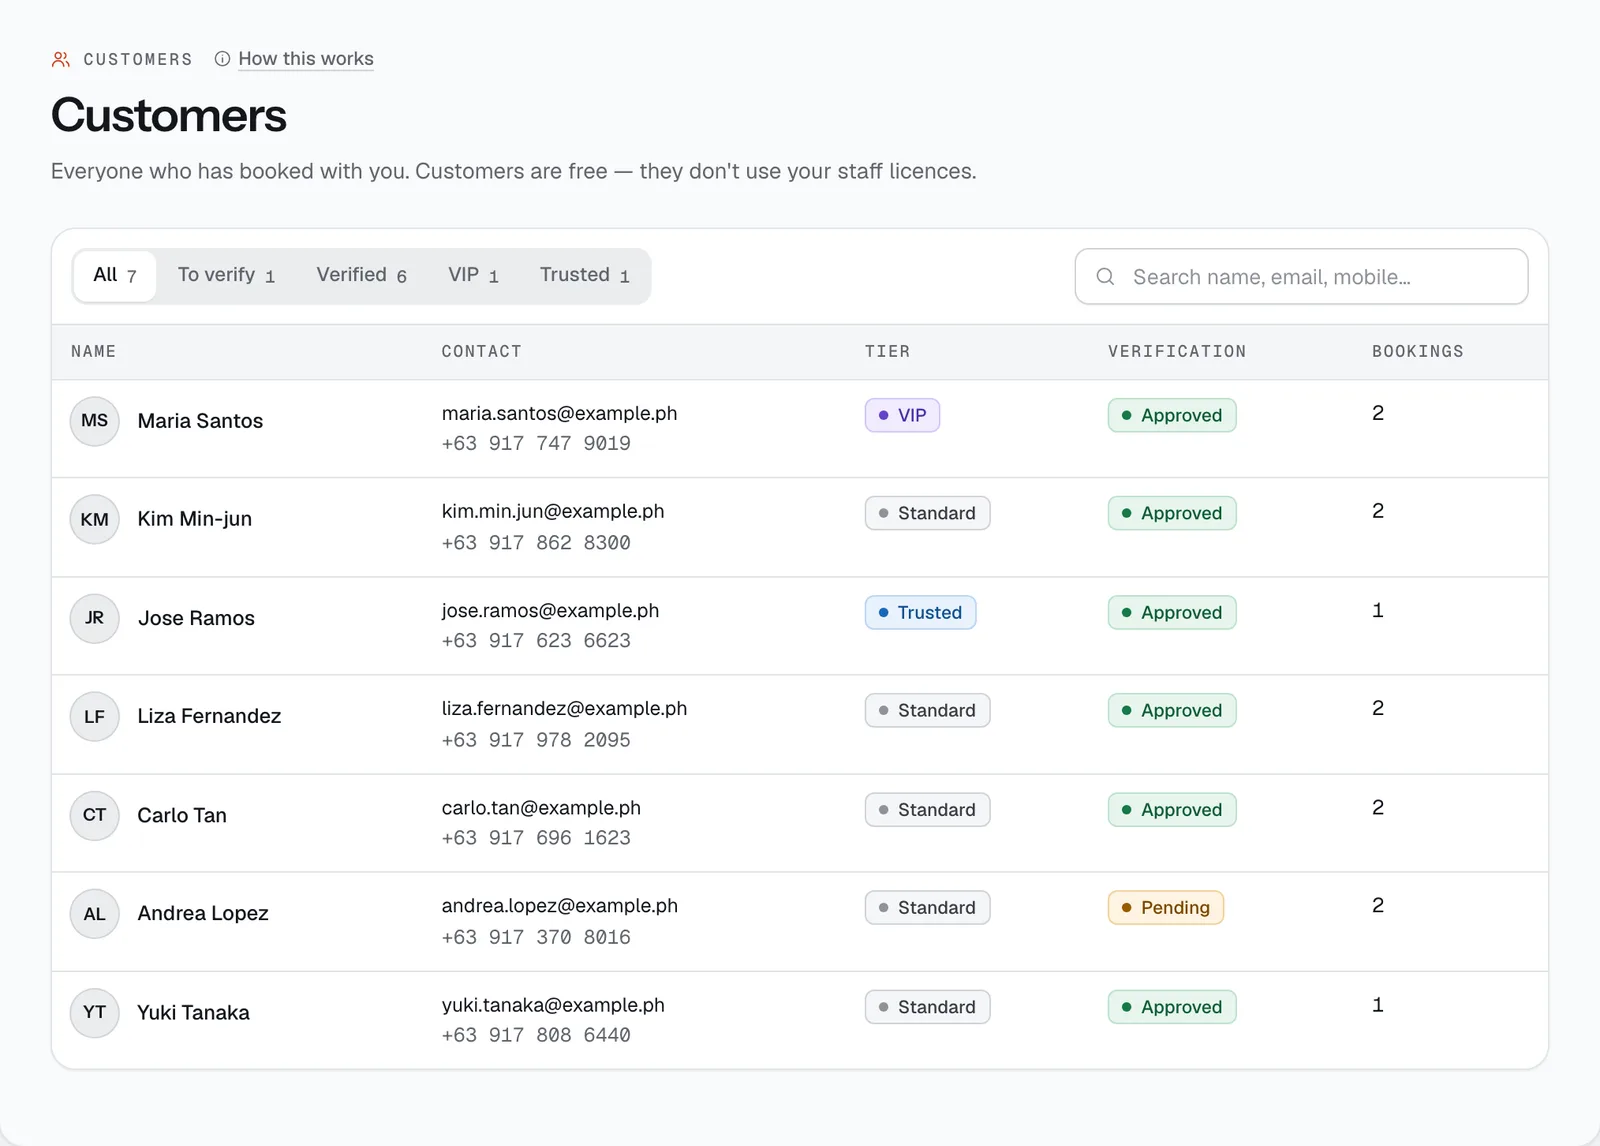
- Filter the list with All, To verify, Verified, VIP and Trusted, or search by name, email or mobile.
- Open a customer to see their bookings, Rental spend and Lifetime bookings.
- Review a licence and selfie, then Approve, Ask for more or Reject.
- Check a licence against LTO’s own record by SMS to 2600 or the eLicense QR, then Save check.
- Set the customer’s Tier: Standard (pay in full), Trusted (partial allowed) or VIP (partial / deposit-only).
- Stop someone booking with you using Suspend customer…, and undo it with Lift suspension.
- See and report matches on the shared renter watchlist, if you take part.
- Complete a renter’s request to see, correct or delete their personal data.
How it works
- Customers are added automatically when they book on your site, through a quote or a channel like Klook, or when staff book for them. You can also bring in a list with Import.
- Customers are free. They don’t use any of your staff licences, however many you have.
- The list shows each customer’s tier, verification status and number of bookings. (shared) after the status means the renter reused a verification from another CeeRent operator (see “Verify once” below). A red Suspended badge means they can’t book with you.
- Licence codes. A car needs code B (B1 and B2 count too); a motorcycle needs code A. Once a renter is verified, they can’t book a vehicle their codes don’t cover.
- Suspending needs a reason, which is kept in the audit log. The customer can’t make new bookings with you; their existing bookings stay as they are, and other operators aren’t affected.
Licence verification
On their first booking with you, the renter uploads a photo of their driver’s licence (front) and a selfie, types the licence number and expiry, and ticks their restriction codes. First-time renters can also add a proof of billing (optional). They can still pay while they wait; you approve before pickup.
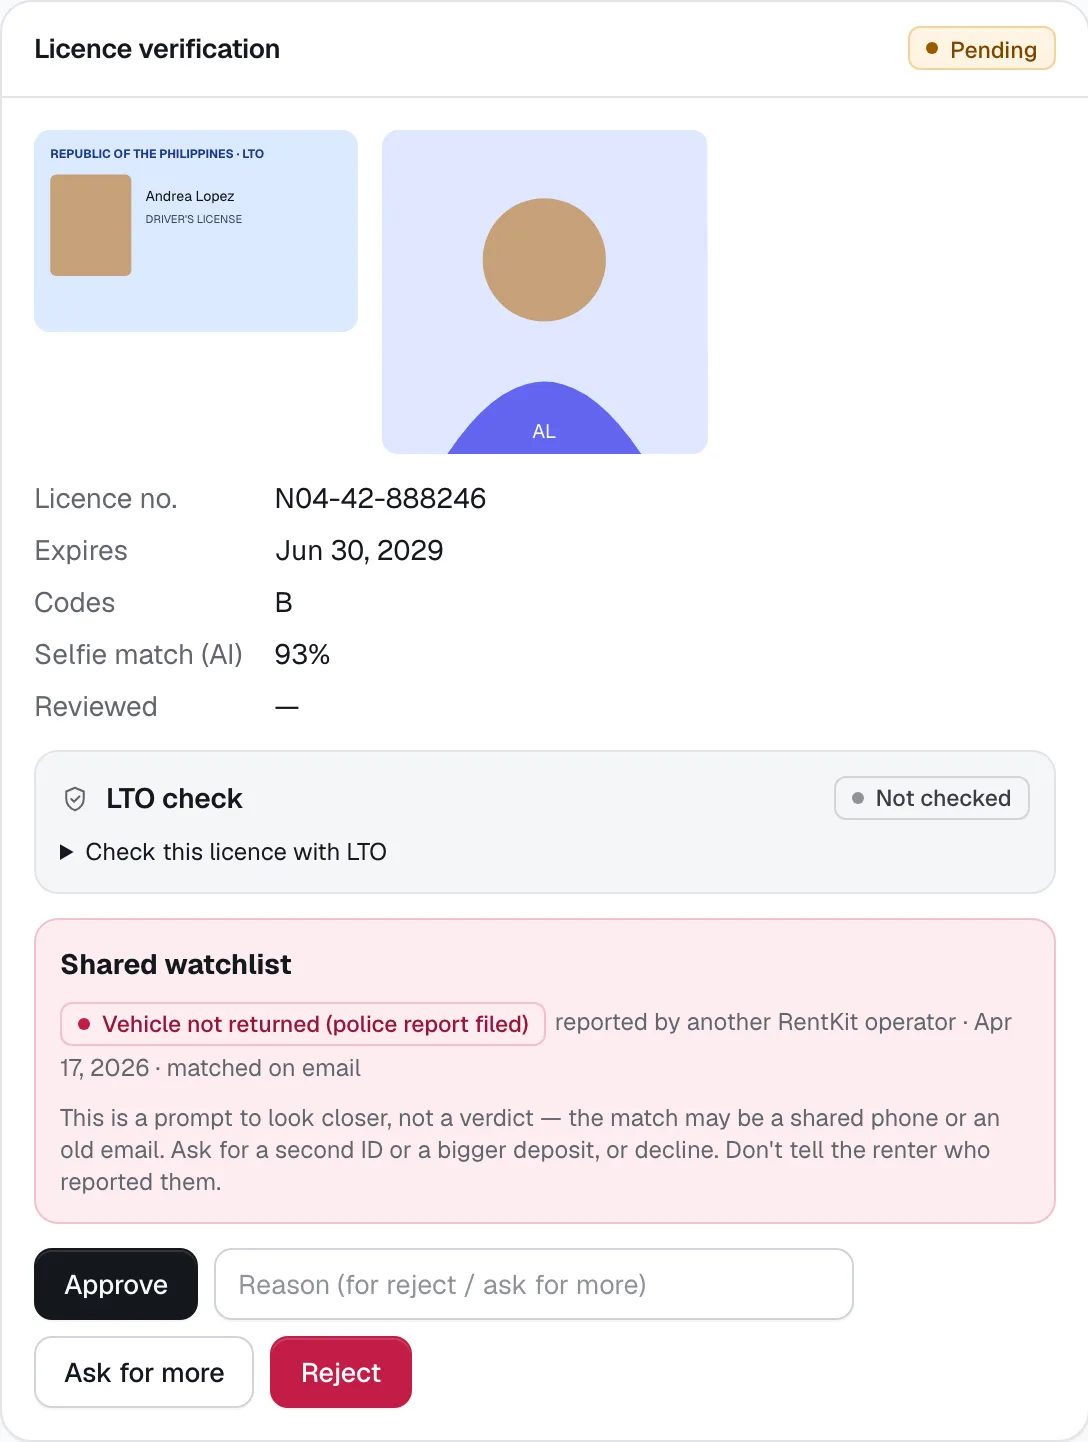
The Licence verification card shows the photos, Licence no., Expires, Codes, a Selfie match (AI) score in percent, and who reviewed it and when. Customers waiting for you are under To verify, and on the Today page.
- Approve: the renter is told they’re verified and won’t need to upload again with you. Pickup can’t start until the licence and selfie are approved.
- Ask for more: type what you need in the Reason (for reject / ask for more) box first. The renter gets it by email and SMS.
- Reject: also needs a reason, and you’re asked to confirm with Reject and refund. All their upcoming confirmed bookings with you are cancelled with a full refund, and they’re told why. The reason stays on your record and is never shown to other operators.
Verify once. When you approve someone, they can later choose to reuse that verification with another CeeRent operator — only if they say yes, one operator at a time. The same works the other way: a renter verified elsewhere may share it with you, and the card says so.
LTO check (2600 SMS or eLicense QR)
A second check on top of the photo and selfie: compare what the renter uploaded with LTO’s own record. Open Check this licence with LTO in the licence card and pick a method.
- SMS to 2600: from any Globe, Smart or DITO phone, text
LTO LICENSEfollowed by the licence number to 2600 (₱2.50). On a phone, tap the command and your SMS app opens with it filled in. Paste the whole reply into the box. - eLicense QR: ask the renter to open their eLicense in the LTMS app, scan its QR with your phone camera, and paste what the scan shows.
Press Save check. CeeRent compares the licence number, name and expiry and shows one of three results:
- Matches LTO — everything agrees.
- Doesn't match — for example a different expiry or a name that doesn’t match. Ask the renter to fix their upload, then Check again.
- LTO alarm — LTO has no record, the licence isn’t valid or has expired, or LTO shows an alarm. You can’t approve while there’s an alarm, and you get a staff alert.
Renters can also share their eLicense QR themselves when they upload. The card then says it was shared by the renter, so confirm by SMS if you’re unsure.
To make the check compulsory, tick Settings → Policies → Check every licence with LTO (2600 SMS or eLicense QR) before approving. With that on, you can’t approve until there’s a check that matches.
Tiers: Standard, Trusted and VIP
Every new customer starts as Standard. Change it in the Account card with the Tier menu.
- Standard renters pay the whole rental at checkout.
- Trusted and VIP renters may also choose Pay 50% now, balance at pickup (the % is Settings → Policies → Reservation fee / partial payment; if you take a reservation fee from everyone, every renter gets this option) or Deposit only, rental at pickup. These options aren’t offered with the prepaid rate.
- Both tiers also lower the booking’s risk score (VIP a little more than Trusted), so good regulars are less likely to be flagged at pickup.
Shared renter watchlist
A careful, privacy-minded version of the “scammer list” groups. It’s opt-in: tick Settings → Policies → Take part in the shared renter watchlist. Only operators who take part see matches or can report.
- What’s shared: coded versions of the licence number, mobile and email, a reason and a date. No names, photos or comments.
- Matches: if a renter’s licence, mobile or email matches a report, a Shared watchlist box appears on their licence card with the reason, the date and what matched. It also raises the booking’s risk score.
- A match is a prompt, not a verdict. It could be a shared phone or an old email. Ask for a second ID or a bigger deposit, or decline. Don’t tell the renter who reported them.
Reporting (owners and managers only) is under Report to the shared watchlist. You tick that the report is true and backed by your records, then pick the reason and booking. Only four reasons are allowed, and only when your records on that booking back them up:
- Vehicle not returned (police report filed)
- Confirmed charges unpaid for 30+ days
- Forged or someone else’s licence
- Chargeback or payment fraud
The renter is told by email and SMS, with the reason and a way to appeal to the CeeRent team. Reports end after 2 years. You can take back your own report any time with Withdraw.
Personal data requests
Renters can ask, from their account on your booking site, to see, correct or delete the personal data you hold. You get a staff alert, and the request shows on the customer under Personal data requests.
- Access: Export and send emails the renter a copy of their details and bookings.
- Correction: type the corrected name, phone or email, then Apply correction.
- Deletion: Delete personal data (anonymise records), then type DELETE to confirm. Their name, contact details, licence and photos are removed. Bookings and money records stay for your books, without the person, and their reviews show as “Former renter”. This can’t be undone, and it isn’t possible while they have an active booking.
Reviews
After a rental is closed, the renter can leave 1 to 5 stars and a few words from their booking page — one review per rental. Reviews show on that vehicle’s listing with the renter’s first name and last initial, and the star average appears on the listing and in your search results. Your overall Average rating is in Reports.
You can’t edit or remove a review from the dashboard. If you’d rather not show reviews, hide the Reviews block on vehicle pages in Site Builder.
- LTO check
- Approve
- Ask for more
- Reject
Still not sure how it works?
Ask a person, in Filipino or English — Mon–Sat, 8:00–20:00 PHT.