Sign up and go live
Create your account, work through the setup steps, switch your booking site on and share it. Most operators finish in one sitting.
- Time
- 20 min · 8 steps
- Plans
- Every plan. The 14-day free trial runs on the plan you pick, with every feature.
- Where
- ceerent.com/signup → Get set up
- Checked
- Sep 25, 2026
Fill in the sign-up form
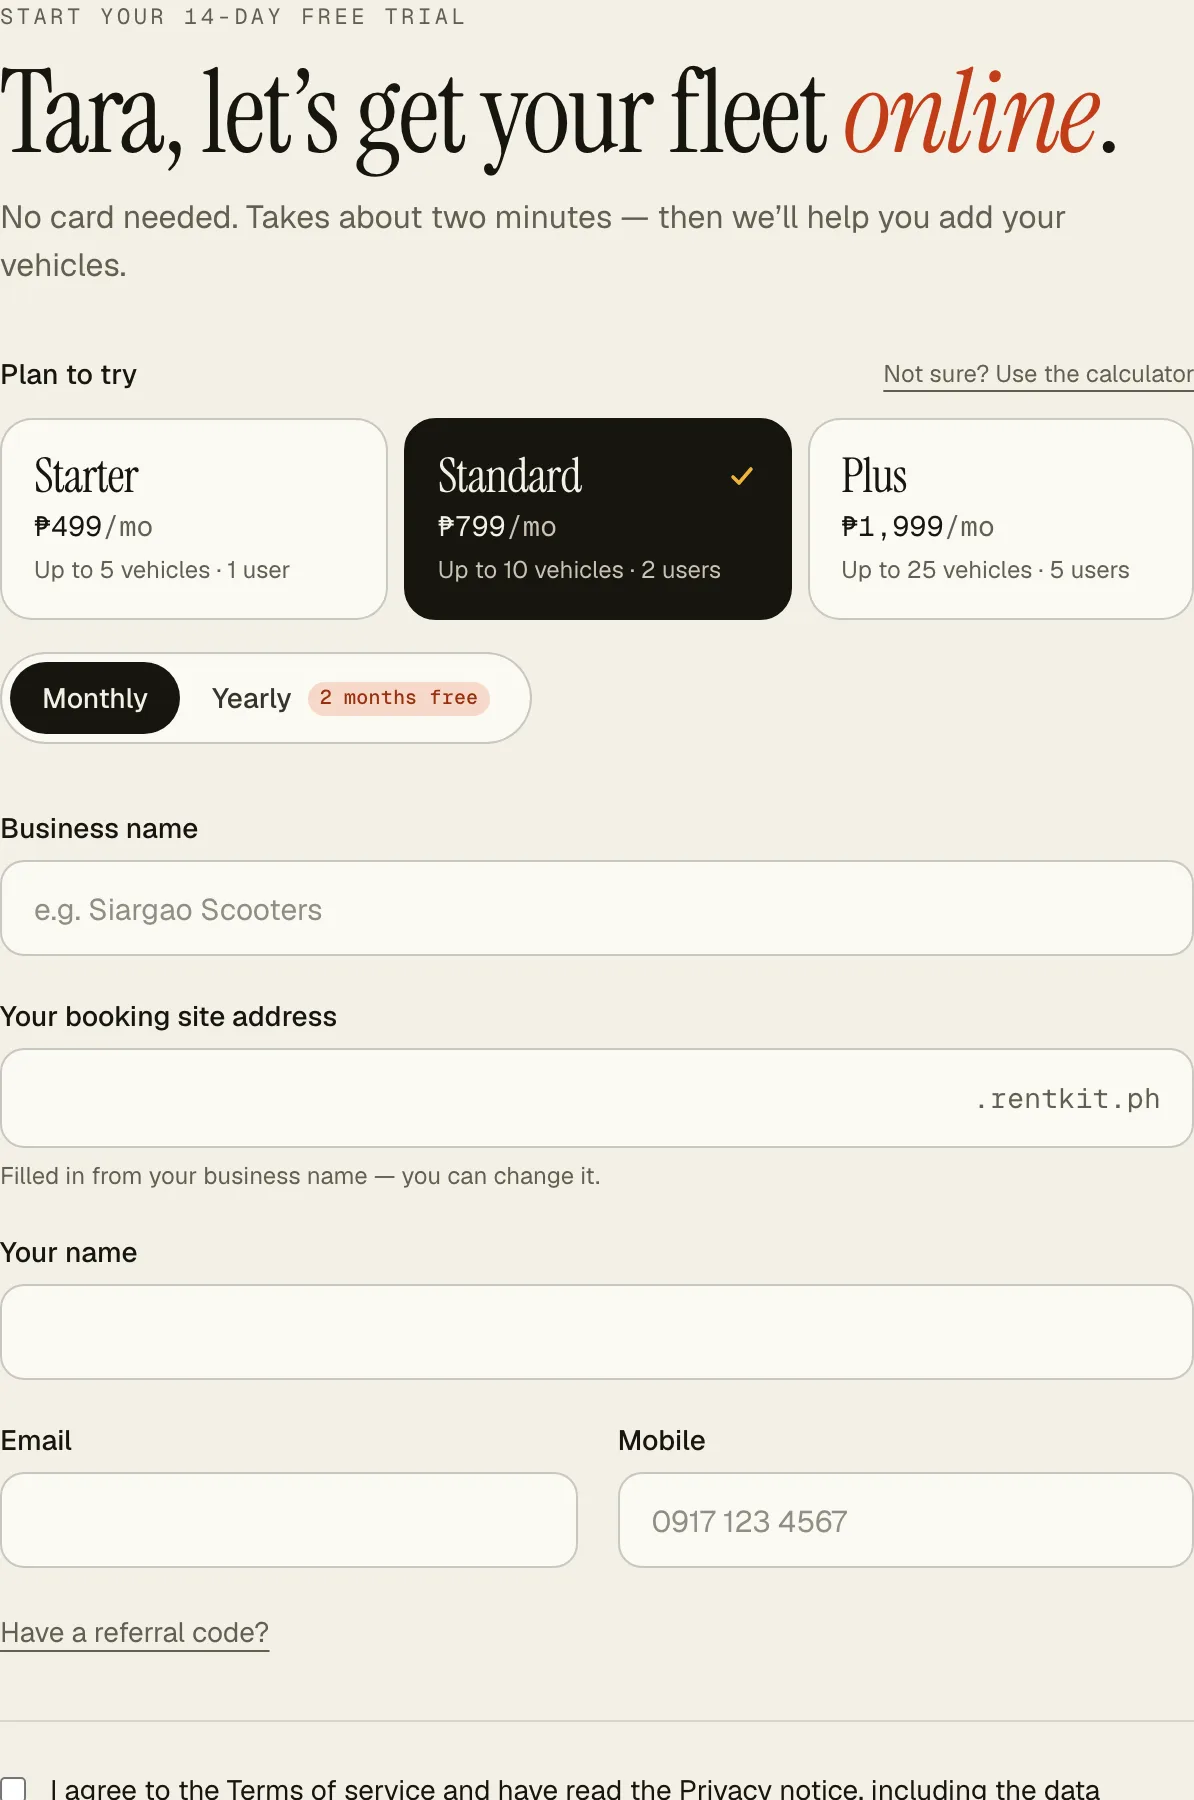
Go to ceerent.com/signup. Pick the Plan to try — the trial has every feature, and the plan sets how many vehicles you can list; you can change it before you pay. On a phone the plan shows as one line: tap Change to pick another. Then fill in:
- Business name — at least 3 letters.
- Your booking site address — filled in from your business name, e.g. siargao-scooters.ceerent.com. Change it if you like; it needs at least 3 letters or numbers and must not be taken.
- Your name, Email (your sign-in links go there) and Mobile.
- A Referral code if another operator gave you one (tap Have a referral code?).
Tick the terms and tap Start free trial. No card is needed — due today is ₱0.
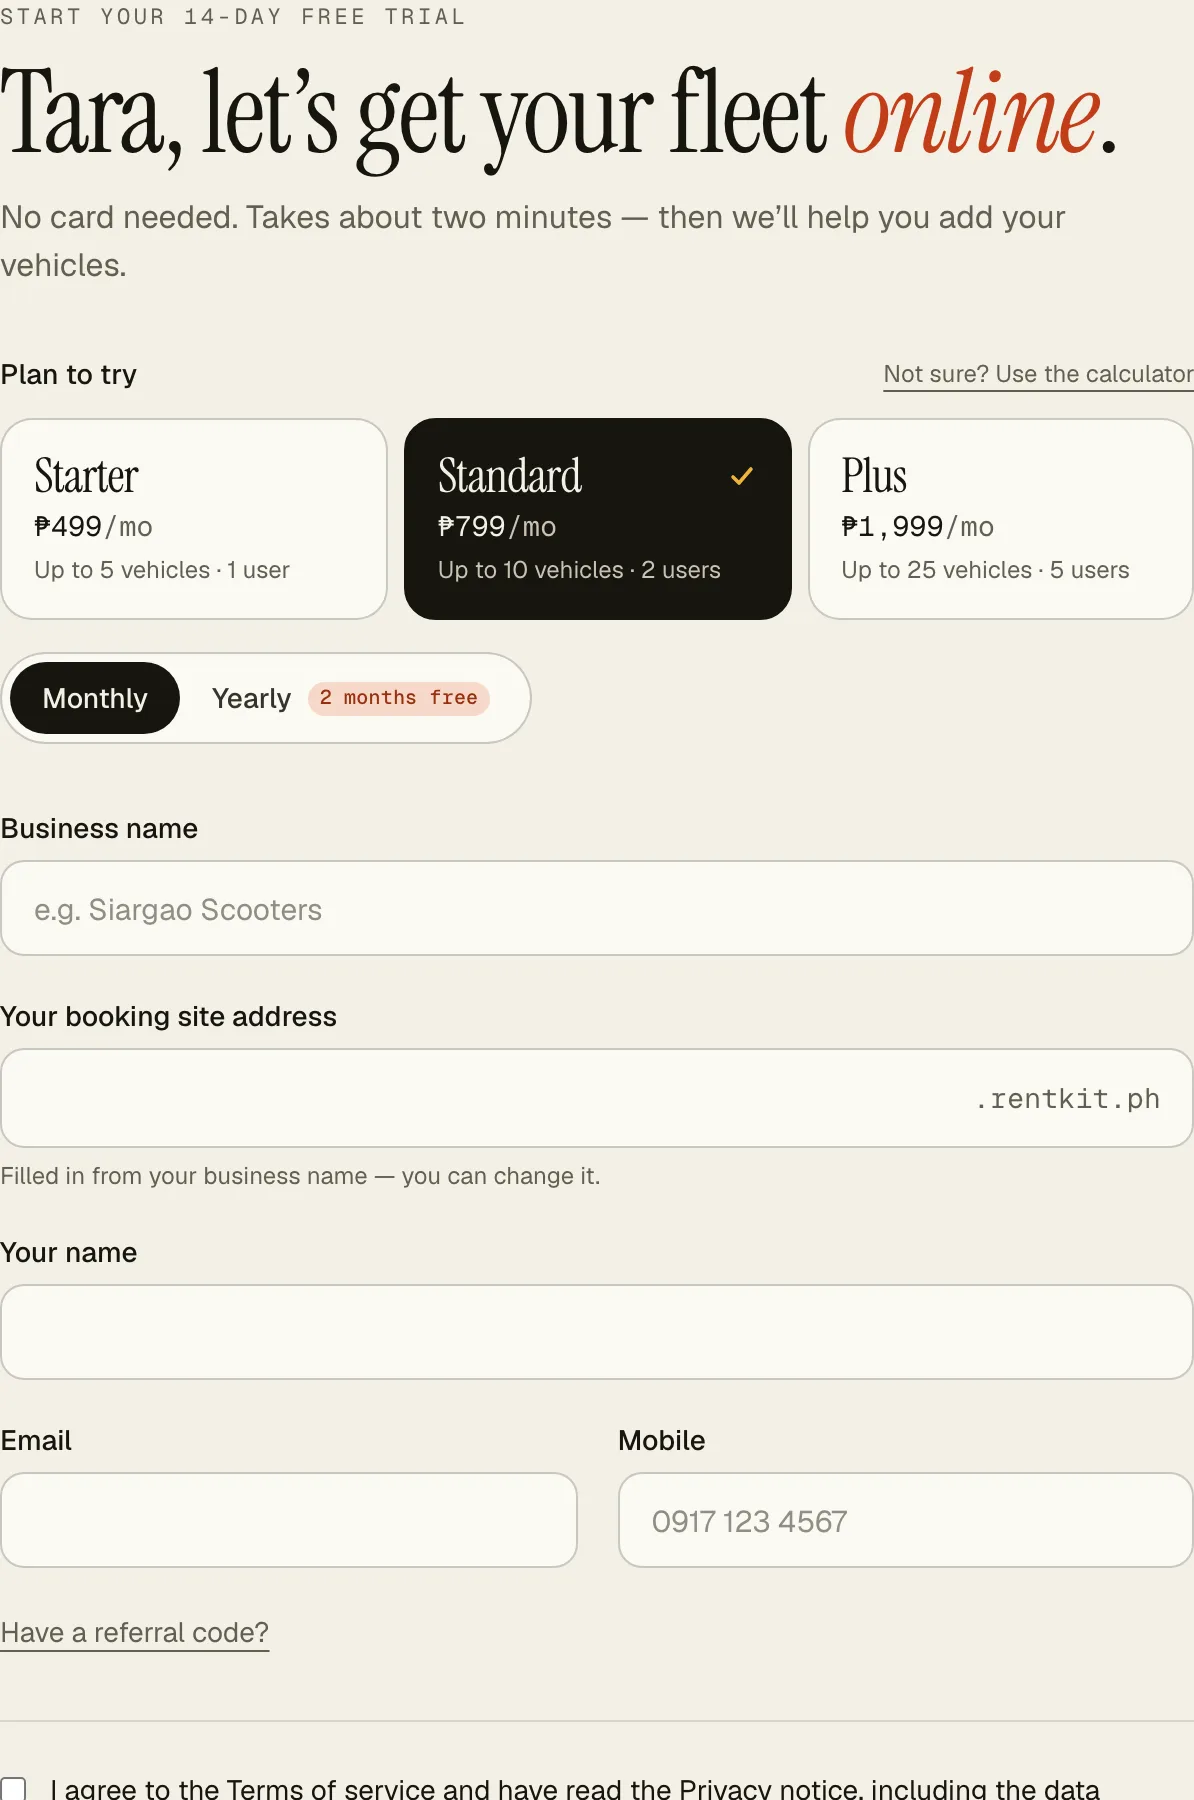
- Plan to try
- Your booking site address
- Have a referral code?
Turn on two-step sign-in
Owners and managers use two-step sign-in — a 6-digit code from an app on your phone, so someone who gets into your email still can’t reach your bookings or payouts. A new account can set up first: a yellow bar at the top says how many days are left (7), and you tap Set up now when you’re ready. It’s needed before you connect your payment account or go live, whichever comes first.
Get a free authenticator app on your phone — Google Authenticator or Microsoft Authenticator from the App Store or Play Store (no account needed; 1Password works too). On a computer, tap + in the app and scan the code on screen. On your phone, tap Copy key, then in the app tap + → Enter a setup key and paste it. Type the 6-digit code the app shows and tap Turn on two-step sign-in. It takes a couple of minutes.
There’s no password. Next time you go to ceerent.com/login, tap Email me a sign-in link, open the link (it works for 15 minutes) and enter the code from your app.
Add your business details
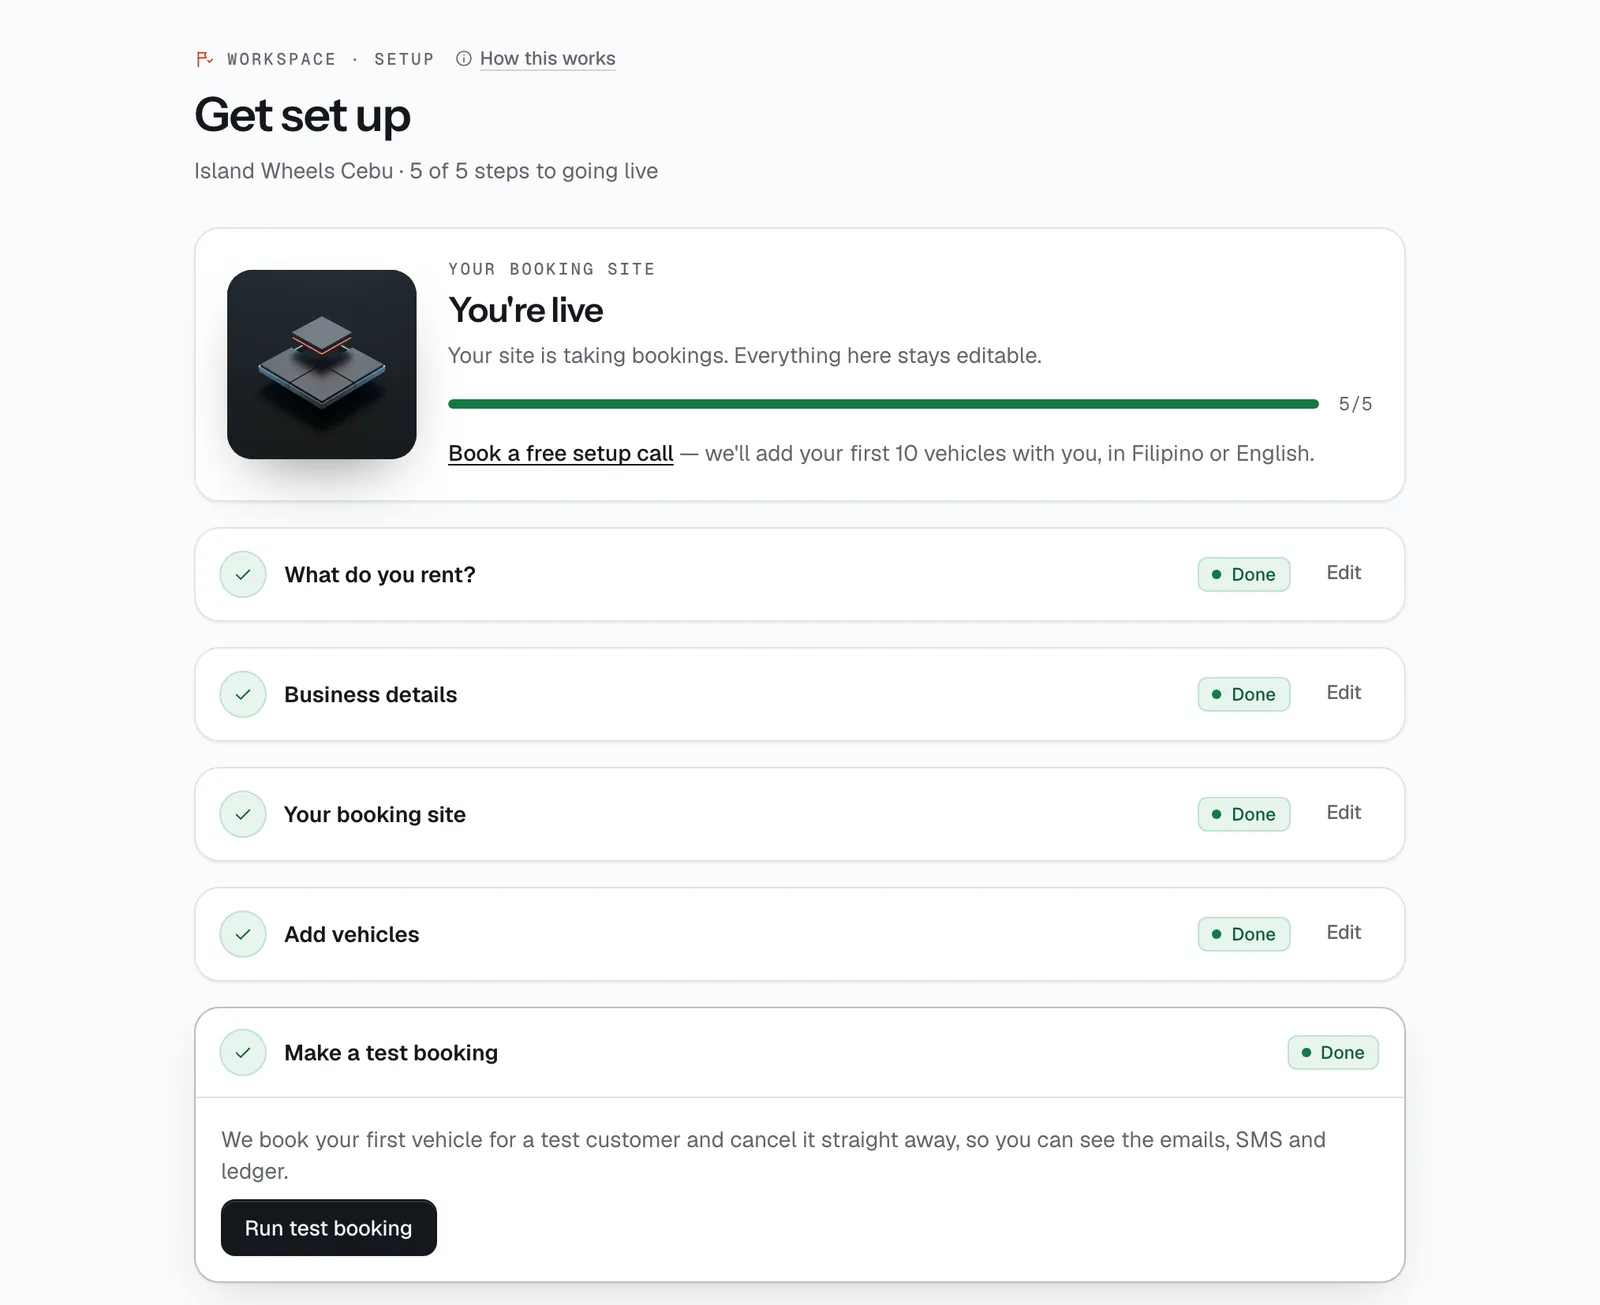
You land on Get set up (it’s also at the top of the sidebar until you’re live): eight steps with a progress bar. The next step to do is open; finished steps show Done and can be reopened with Edit.
First, What do you rent? — tick everything that applies (self-drive cars, scooters, wedding cars, chauffeur, van tours, monthly) and Save. CeeRent sets your starting rules to match — deposits, when renters pay, cancellations — suggests a site theme and trims the sidebar to the pages you need (Show all pages brings the rest back). It tells you what it set and lists your starting rules with the amounts renters will see — the deposit, when they pay, cancelling, late returns, fuel and kilometres. Change anything in Settings → Policies.
In Business details, enter your Registered business name, the Pickup address where renters collect vehicles and, if you have it handy, your TIN (printed on your receipts — you can add it later). Save and continue needs the address. Write it the way renters would look for it: street, barangay and town.
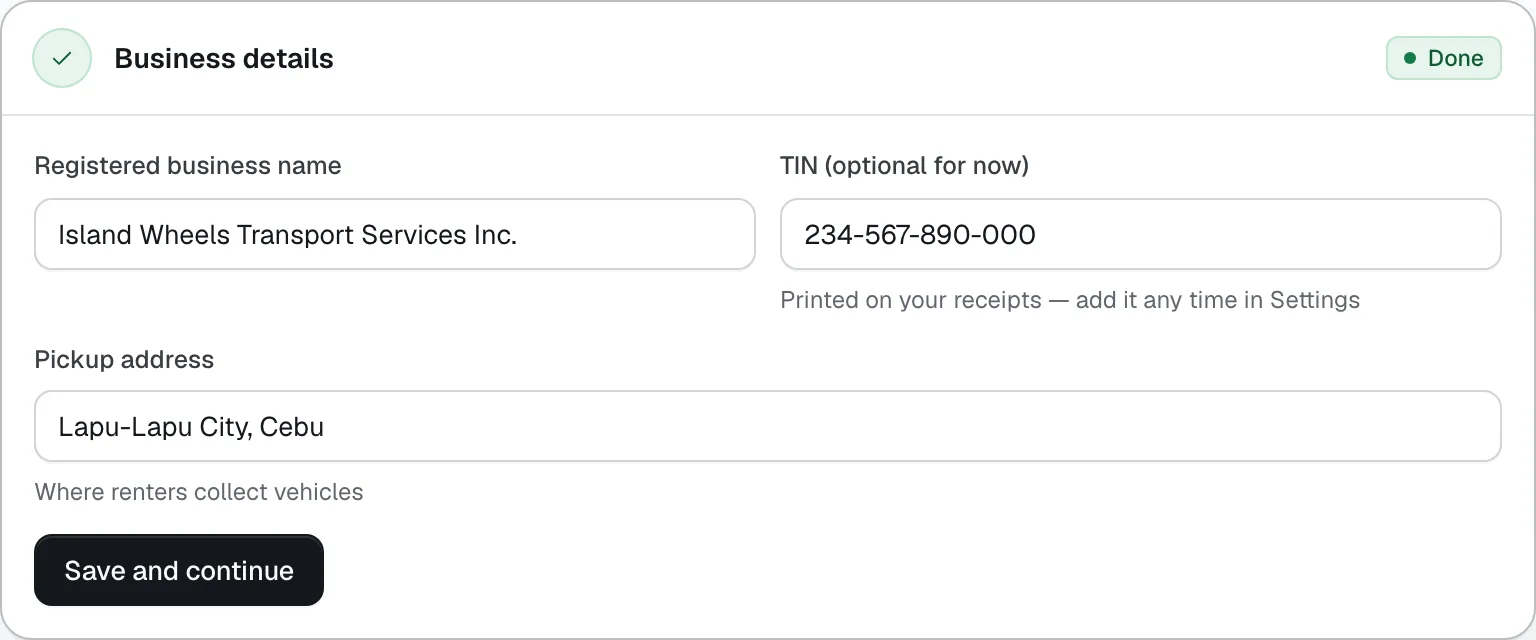
- TIN
- Pickup address
- Save and continue
Connect your payment account
Renters pay into your own Xendit account — Xendit is the licensed payment gateway behind GCash, Maya, card, QR Ph and over-the-counter payments. CeeRent never holds your booking money.
Tap Turn on online payments — CeeRent opens the account for you, there’s nothing else to sign up for — then finish Xendit’s own check of your business with Complete Xendit verification. When it’s done, Settings → Payment account shows Verified. Only the owner can do this step, with two-step sign-in on. Xendit’s check can take a few days — you don’t have to wait for it to go live (see step 6).
More in Get paid.

- Status
Set your colour and tagline
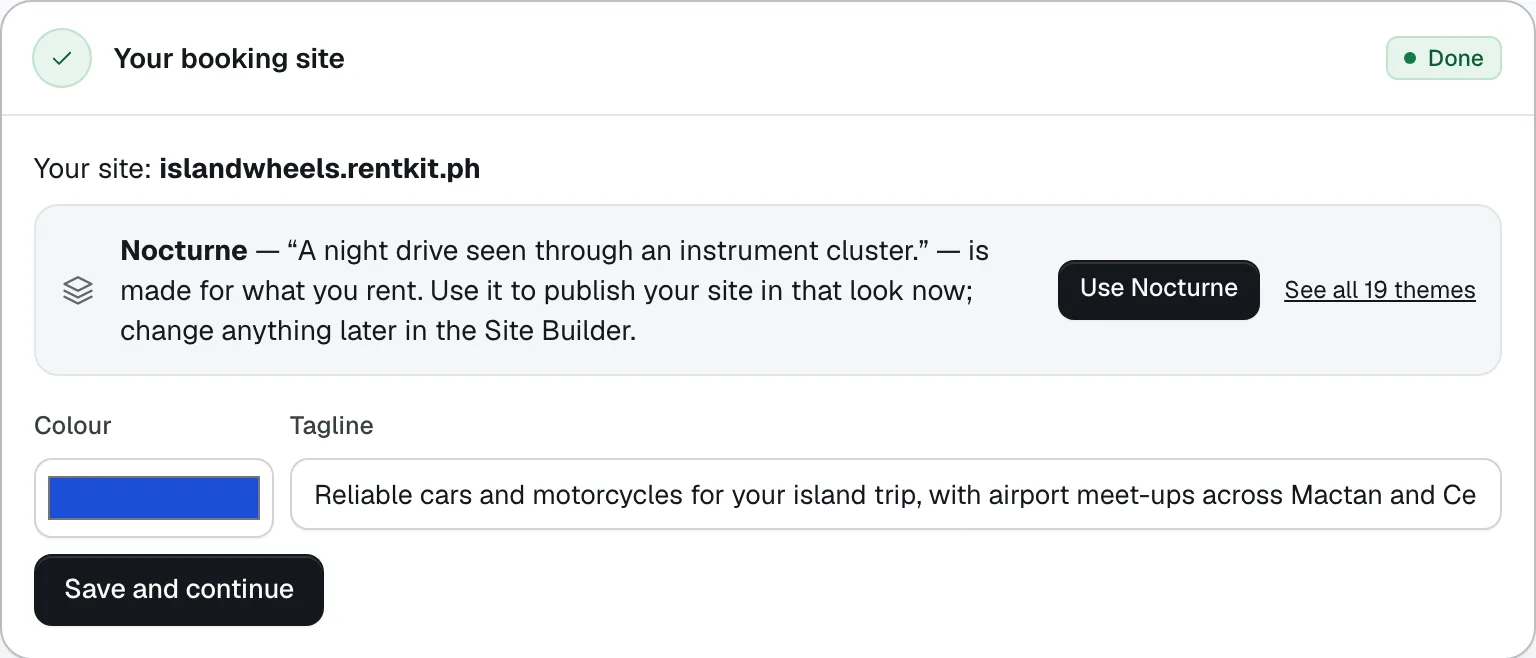
Your booking site shows your site address and the theme made for what you rent — Vows for wedding cars, Chauffeur for transfers, Wayfarer for tours, Island Coastal for scooters. Use it to give your site that look in one tap — renters only see it once you go live. Pick a Colour and write a short Tagline — one line on what you rent and where, e.g. “Scooters for Siargao, delivered to your resort.” Tap Save and continue.
This is only a start. Photos, pages and the other themes are in the Site Builder — see Design and publish your booking site.
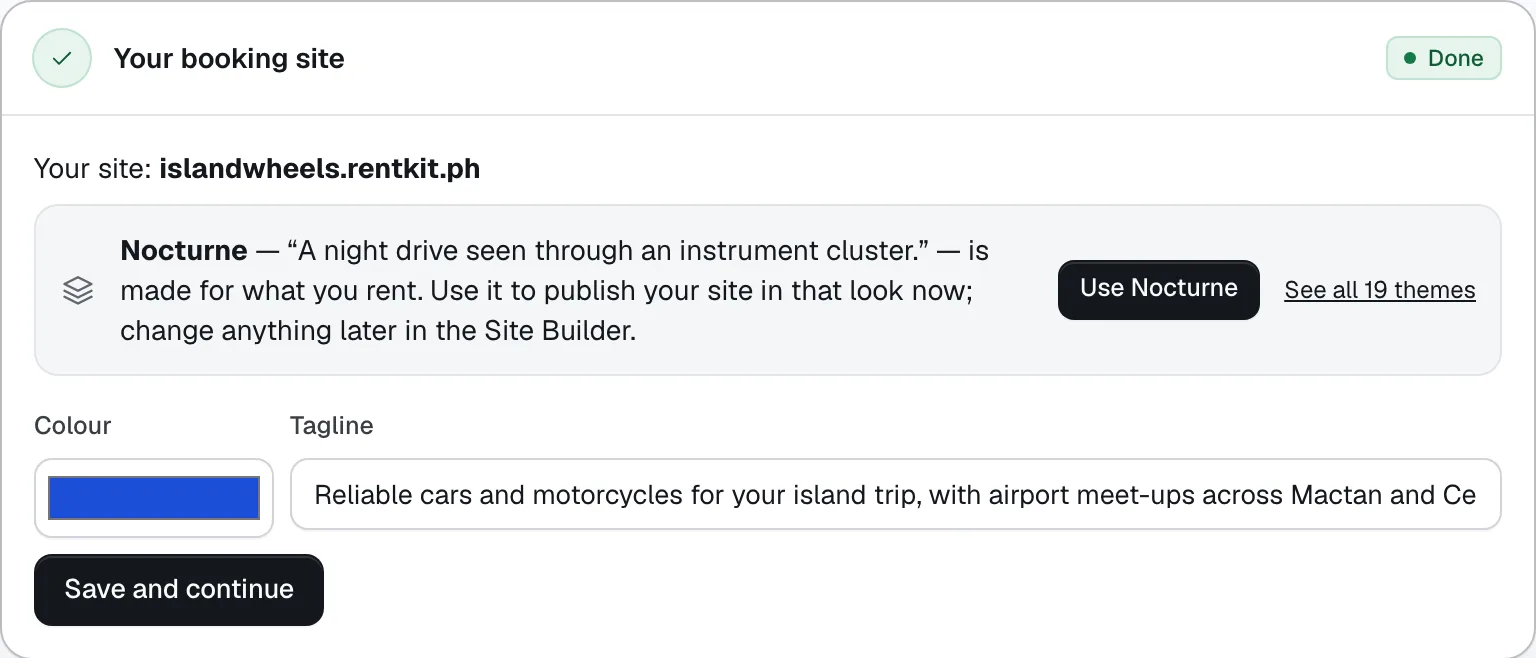
- Colour
- Tagline
Add vehicles and invite your staff
Use Add a vehicle to add them one by one, or Import from a spreadsheet if you keep your fleet in Excel or Google Sheets (how to import). On Standard and Plus, Invite staff opens Team & licences (how to set up your team).
The Add a vehicle form asks for the basics, the daily rate and a Photo — a real photo of that unit, since renters book what they see. Papers, maintenance and GPS fold into More details for later. After saving, Add your next vehicle or go back to Get set up.
This step is done once you have at least one active vehicle. Your plan sets how many you can have active: Starter 5, Standard 10, Plus 25.

- Add a vehicle
- Import from a spreadsheet
Run a test booking
Tap Run test booking. CeeRent books your first vehicle for a pretend renter, “Test Customer”, records it as paid in test cash, and cancels it straight away. Nobody is charged, and the confirmation texts and emails go to a test address, not to a real renter.
Then look at what a real booking would do: the emails and texts in Workspace → Sent messages, and the booking itself in Bookings with its money ledger.
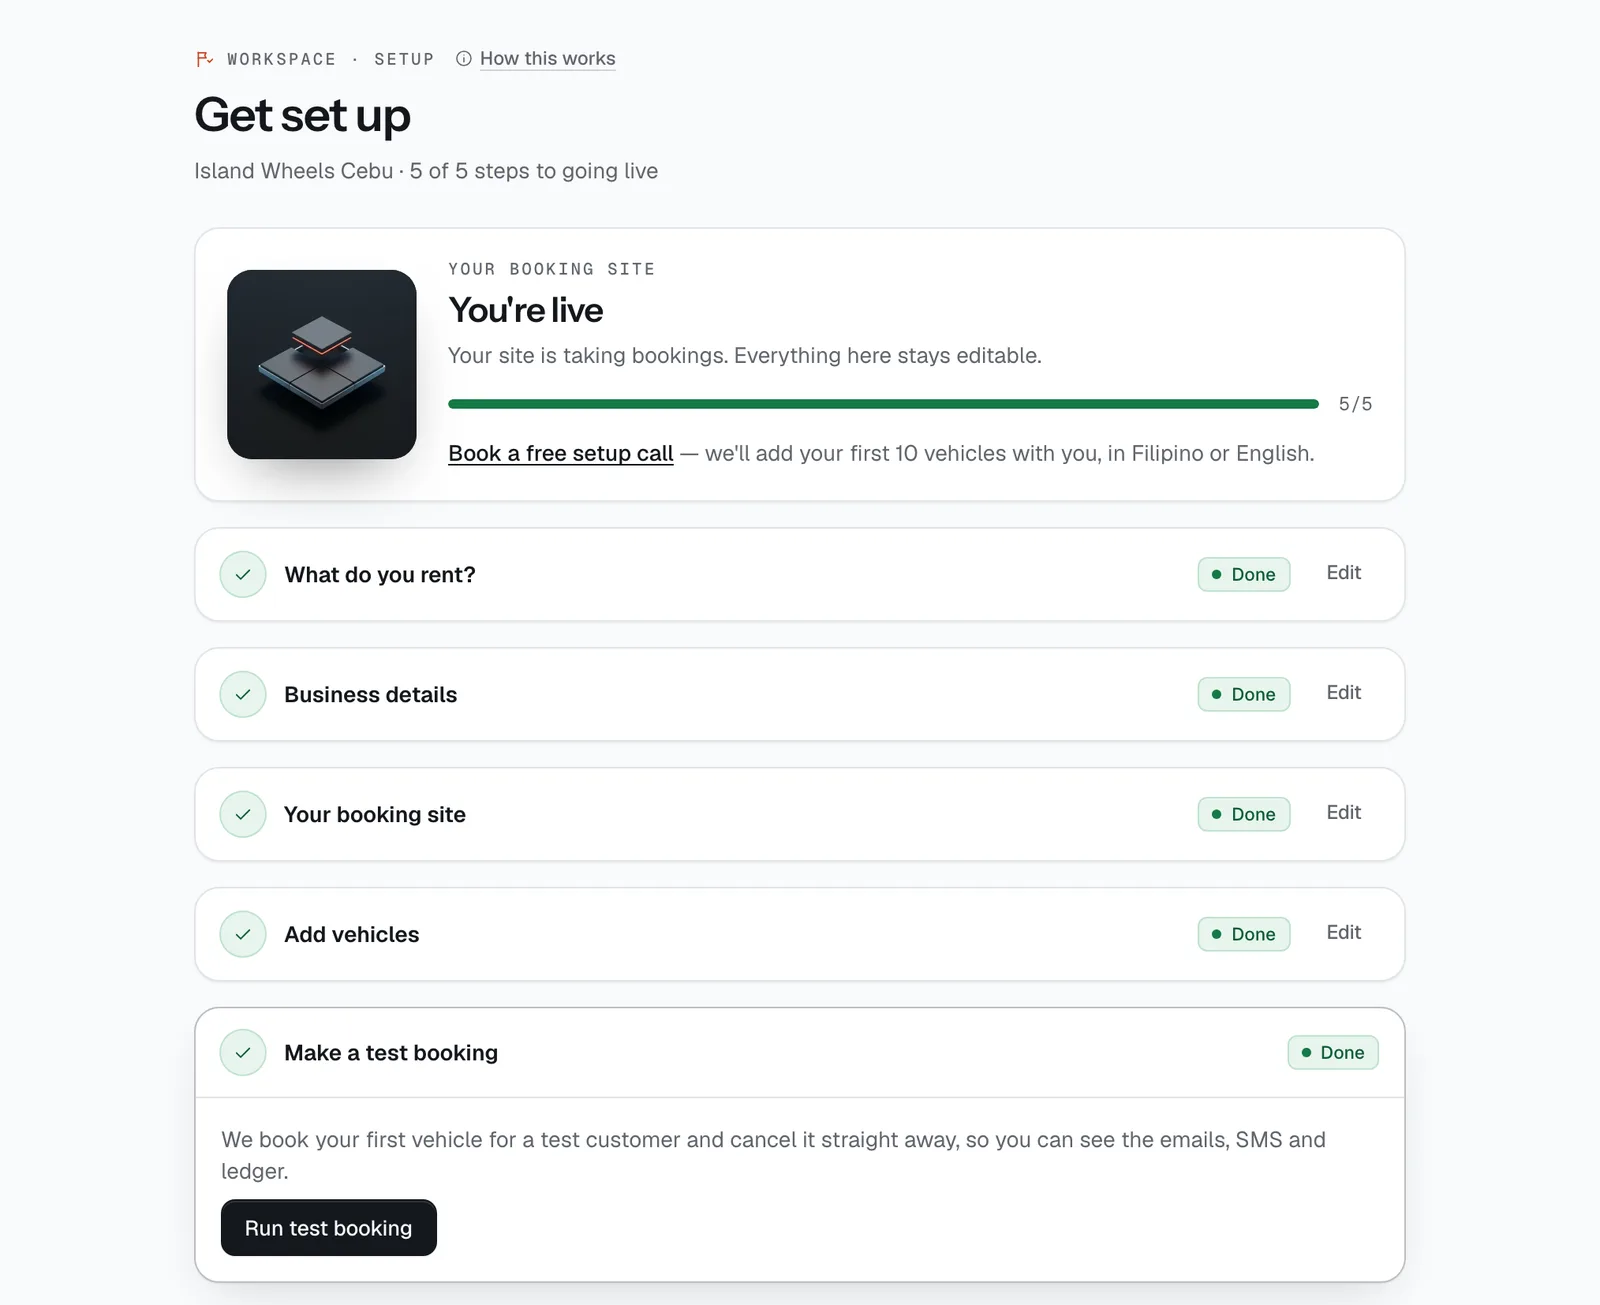
- Setup progress
- Run test booking
Go live
When your business details, branding, a vehicle and the test booking are done, the owner checks the starting rules one last time and taps Go live (two-step sign-in has to be on). You’ll see “Live at yourname.ceerent.com”.
Then tell renters: Share your booking site (on Get set up, and on Today until your first booking) has Copy link, Post on Facebook, Copy a ready-made post and, on a phone, Send in Messenger, Viber…. Add the link to your Facebook page as a Book now button, and save it as a Messenger saved reply for everyone who asks “available pa?”.
If Xendit hasn’t verified you yet, you can still go live: renters send booking requests instead of paying. The car is kept for them, you get an alert, and you Accept or Decline on the booking (a request you don’t answer within 12 hours lapses). The renter pays at pickup, in cash at your desk. Once Xendit verifies you, checkout takes GCash, Maya and cards by itself and you’re told.
Until then your site doesn’t take online bookings, but you and your staff can already add bookings by hand in Bookings → New booking.



Good to know
- Your trial lasts 14 days with every feature, plus one free 3D model credit. We remind you by email and SMS on day 10 and day 13.
- To keep going after the trial, open Subscription and tap Choose plan & pay. Monthly plans are paid by card or Maya and renew by themselves; GCash, QR Ph and bank transfer are for yearly plans (yearly is 10 months’ price for 12). See Pricing.
- If the trial ends without a plan, new bookings pause — your vehicles, bookings and settings all stay, and your data is kept for 90 days. Choose a plan to switch your site back on.
- You can leave Get set up at any time and come back; nothing is published until you go live. Prefer a hand? Book a free setup call.
Stuck on a step?
A person answers, in Filipino or English — Mon–Sat, 8:00–20:00 PHT.
- Bring your fleet across from a spreadsheetImport the vehicles, customers and upcoming bookings you already keep in Excel or Google Sheets — in the right order — and fix any rows that don't go in.20 min
- Get paid: online, by link and at the counterConnect your Xendit account, let renters pay by GCash, Maya, card, QR Ph or over the counter, take chat and phone bookings with a payment link, collect the rest at the desk and send refunds.15 min
- Design and publish your booking sitePick a theme, edit your site in a draft, send a preview, publish when it's right — then add languages, your own domain or a widget, and share the link.25 min
- Set up your teamGive each person the right role, licence and branches, set refund limits, keep sign-in safe, and switch access off the day someone leaves.10 min